Showing posts with label Make. Show all posts

Sunday, September 11, 2016

Family Pancakes


For the past couple of years my husband has been obsessed with perfecting the ultimate Sunday pancake.  Think Alton Brown from the Food Network style but more laid back with kids and a dog running all over the kitchen.

The recipe is finally post worthy and oh so yummy!  It's name formerly known as "Dad's Sunday Pancakes" is now "Family Pancakes" because our kids know the recipe by heart mostly and love to help too!  

So here you go, put on some music we like soul music for Sunday mornings, make a mess in your kitchen and start a new family tradition! 

Enjoy!

Family Pancakes 

Dry Ingredients:
2 cups all purpose flour
1/4 cup sugar
2 1/2 teaspoons baking powder
1 teaspoon baking soda
1 teaspoon salt

Wet Ingredients:
2 eggs, room temp
2 cups milk 2% or higher
1 lemon
4 tablespoons unsalted butter melted
1/2 teaspoon vanilla extract 

Sift dry ingredients into a bowl.  In a separate bowl, combine milk, juice of one lemon and let stand for 5 minutes.

Whisk in the remaining wet ingredients.  Combine wet ingredients into dry ingredients until smooth.

Use about 1/4 cup measure of batter in an ice cream scoop to drop batter on to ungreased skillet on medium high heat.

Cook to golden brown on each side.


Monday, May 12, 2014

Key Lime Pie with a Twist

After a fabulous dinner and dessert at The Grocery in Charleston, SC  I left dreaming about their key lime pie.  

It was served like an upside down cake.  The buttery graham cracker crust was on top, followed by the tart lime custard and creme all in a perfect little circle.  Genius!

I was completely inspired to think out of the pie box.  So I went home and dug up the richest key lime pie recipe I could find and made some of the pie in a springform pan and the rest in individual ramikens.  

Here are the results and the recipe I used.  My kids loved eating the pie this way! 

What twists on pies have you tried that were a success?  Please share!


Sunday, April 27, 2014

Creme Brûlée French Toast


Looking for a super simple make ahead brunch idea?  You've got to try my friend Ashley's Creme Brûlée French Toast!

It's like bread pudding and creme brûlée got married.  The sweet gooey topping perfectly compliments the cakey French toast.  

Your guests will think you were up all morning preparing brunch, but really it couldn't be simpler.  My favorite kind of dish - all the love but little work!

Ashley's Creme Brûlée French Toast

Ingredients:

2 Tablespoons honey (you could also use corn syrup)
1/2 cup butter
1 cup brown sugar, packed
1 loaf Challah (any bread will do)
5 eggs
1 1/2 cups half and half
1 teaspoon vanilla
1 teaspoon Grand Marnier
1/4 teaspoon salt

Directions:

In a small saucepan combine honey, butter and sugar.  Simmer until syrupy.  Pour into a 9x13 baking pan that has been sprayed with oil.  Pour the syrup into the baking pan.  Arrange thick bread slices on top of syrup.  Whisk remaining ingredients until blended.  Pour evenly over bread.  Let sit overnight covered in the refrigerator.  It will still work if you prepare it the day you bake it.  Bake uncovered at 350 degrees for 45 minutes.  Let cool and cut into slices.  Serve syrup side up and top with fruit.

Happy Sunday!

xo

Kelly

Monday, February 3, 2014

Homemade Bread in 5 Minutes


One of my oldest friends another Jenna! started making her own bread and claimed it was so easy even I could do it.  

At the time I had 3 kids under 3.  I didn't have time to open a pack of pop-tarts let alone make my own bread!

Nonetheless, she sent me the link for the recipe...Artisan Bread in 5 Minutes.  I took one look and gave it a fat NO!

She insisted on coming over and giving me a personal bread making demonstration.  

To my surprise it was so easy that, yes, even I could do it!

You can try and follow the website's recipe or take a look at my step by step instructions with pictures below.  I tried to make it busy mom friendly.  

Ready to give it a try?  Check out my version of the recipe - I know you'll love it!

Artisan Bread Recipe

Tools: 
Deep bowl 
Plate
Clean dish towel
Sheet of parchment paper
Baking tray
Measuring cups and spoons

Ingredients:
1 tablespoon Active Dry Yeast
1 tablespoon salt
3 1/2 cups lukewarm water
6 1/2 cups all purpose flour

Directions:
In a deep bowl add the following ingredients...

1 tablespoon ACTIVE DRY YEAST


1 tablespoon of kosher salt


3 1/2 cups lukewarm water


Stir ingredients

Add 6 1/2 cups all purpose flour


Stir

Your dough will look like this...


Throw a clean dish towel over your bowl on the countertop for 2 hours.  I used to use 2 baby bibbs, ha!

It will rise and look like this...


Place a plate on top of your bowl of dough, but make sure it is not completely sealed.  Stick it in the frig until ready to bake.  Let it chill for about 1 hour. 

Place a layer of parchment on an oven tray and preheat the oven to 400 degrees.

After your dough has chilled, flour your hands and the top of your dough generously or it will be too sticky to pick up.

Pick up a softball sized slab of dough and tuck the edges under to form a loaf.  Take a serrated knife and make 3 quarter inch slices across the top of your loaf.

It should look something like this...


Let the unbaked loaf sit on the counter for about 15-20 minutes while the oven is  warming up.

After the loaf is done resting, stick it in the oven for 30 minutes or until the surface is golden.

See the pic at the top for a look of the finished product!

Let it is sit for 10-15 minutes before digging in.  

Repeat the process with the remaining dough the next time you are hungry for bread.  

The dough is good for about a week.  I've found the dough gets a little crunchy after that.  


Friday, January 31, 2014

Easy Super Bowl Party App!


My mother-in-law makes these simple but addictive salami, cream cheese and horseradish bites.  They are everyone's favorite and you can make them ahead - perfect for an easy Superbowl Sunday app!

Meemaw's Salami Snacks

• 3/4 pound of thinly sliced hard salami
• 1 tub of soft cream cheese
• 1-2 teaspoons of horseradish

Add 1-2 teaspoons of horseradish to the soft cream cheese.  Spread a thin layer of the cream cheese mixture on the salami.  Top with a slice of salami.  Add one more layer of the cream cheese mixture and place a final slice of salami on top.  You'll have 3 layers of salami and 2 layers of the cream cheese mixture.

Place completed salami snacks on a cookie sheet and freeze for 1 hour.  

When the hour is up, take the snacks out of the freezer and cut each round into fourths.  

Refreeze until ready to use.  

Enjoy!


Tuesday, December 3, 2013

Christmas Tree Hunt with Coquito!


We took a long drive out into the country to do our annual Christmas tree hunt.  This year I introduced a new tradition of tailgating with coquito!  What's that you ask?  Coquito is basically a twist on the old egg nog served during the Christmas season in Puerto Rico.  It's creamy with a coconut and cinnamon flavor, completely delicious! 

My husband renamed it "Christmas Magic" - taste it and you'll know why!

Note: There are a ton of recipes for coquito out there, but mine is a happy mistake that I stumbled upon forgetting an ingredient in the Goya recipe.  It's slightly less fattening than some of the other traditional recipes.


Coquito or "Christmas Magic"

2 (12oz cans) of evaporated milk
1 (15oz can) cream of coconut
1 (14oz can) coconut milk
1/2 cup white rum
1 teaspoon vanilla extract
1/2 teaspoon ground cinnamon (more for sprinkling on top)

Combine all ingredients in the blender for 1-2 minutes.  Pour into a pitcher or recycled wine bottle and refrigerate until chilled.  I pour mine over ice and sprinkle with a dash of cinnamon.  You can also increase or omit the rum to your liking!


Please let me know if you enjoy it as much as we do!


Thursday, October 10, 2013

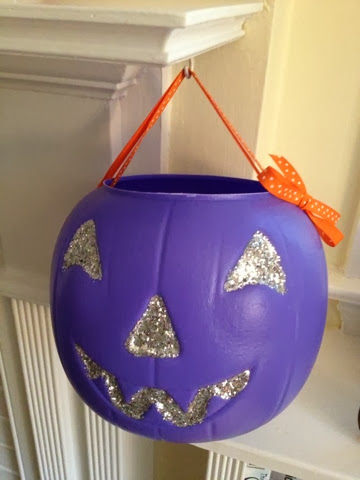
Glam-up Your Halloween Pumpkins!


How fun are these Halloween pumpkins?!  Kayce Hughes my favorite designer has them in her window display right now.  They were too sweet not to make for my kids and friends!  

Any other fun ideas for the good old plastic pumpkins?


Tuesday, August 27, 2013

Chocolate Almond Butter Cookies with Sea Salt


My sister-in-law sent our family a care package from CO with some local goodies, including Justin's Chocolate Almond Butter!   I used the chocolate almond butter in a batch of cookies and was delighted to find a solution to my sweet and salty cravings and a protein packed after school snack for my kids.  Try them - they are addictive!  

Chocolate Almond Butter Cookies with Sea Salt

(Adapted from Gwyneth Paltrow's Almond Butter Cookie Recipe)

1 1/2 cups all purpose flour
1/2 teaspoon kosher salt
1 teaspoon baking powder 
1 cup Justin's Chocolate Almond Butter
1 cup real maple syrup
1 teaspoon pure vanilla extract
Sea salt for topping

Preheat oven to 350 degrees.  Line two baking sheets with parchment paper.

Mix the flour, kosher salt and baking powder in one dish.  In a separate bowl combine the chocolate almond butter, maple syrup and vanilla.  Add the dry ingredients to the wet.  Form the cookies into small balls and set 2 inches apart on your parchment lined baking trays.  Wet your fingers with water and gently smooth the cookies into little round discs.  Sprinkle each cookie with sea salt.

Bake the cookies 10-12 minutes.  Cool on a baking rack before eating.

Note: These cookies would make great homemade ice cream sandwiches.  Just add vanilla ice cream between two cookies and stick them back in the freezer until the ice cream is set.  Yum!


Monday, April 15, 2013

Gywenth's New Cookbook!

I have a million cookbooks and really try to resist buying a new one every time I come across one with a pretty cover. Fast forward to me at Target the other night mesmerized by Gwyneth Paltrow's pretty soft pink cookbook, "It's All Good."

I randomly opened her book to a recipe for Old Bay Ranch Dressing. I was drooling and couldn't wait to substitute her vegan mayo for real mayo and dip some thin cut French fries with sea salt in it.

And that is just what I did! Last night my husband made burgers and fries. I whipped up the Old Bay Ranch Dressing, and we lathered it on our burgers and fries. It was pure deliciousness! I know that was not Gwyneth's intent for her healthy lifestyle cookbook, but I did do sit ups while I watched Chopped after dinner. That counts as healthy in my book!

What are your favorite new GP recipes?


Wednesday, February 13, 2013

Monday, November 12, 2012

Mom's Apple Pie


I absolutely love pie, especially my mom's apple pie. Her pie has a tart Granny Smith apple filling and a yummy cookie crust. My sister, Molly, is known for requesting one of these pies entirely for herself. It is that good! Lucky for us, it is super simple to make. Perfect for your Thanksgiving dessert!

Thanksgiving tradition idea...

In our family we run a 5k for charity the morning of Thanksgiving. It's a nice way to give back and to get ready to chow down the rest of the day!


Mom's Apple Pie

Ingredients:

Apple Core Peeler
6 Granny Smith Apples
One stick melted butter
One large egg
One cup flour
One cup sugar
One tablespoon cinnamon


Directions:

Cut and peel apples and sprinkle with sugar and cinnamon.

Mix the rest of the ingredients together. They will be like a thick paste. Spread over apples and bake for 1 hour at 350 degrees. Enjoy!


Saturday, November 10, 2012

Andy's Charcoal Roasted Turkey

Want a twist on your Thanksgiving turkey?  Try charcoal roasting it!  My husband, Andy, is in love with his charcoal grill.  It came as no surprise that the first time we hosted Thanksgiving dinner, he insisted on taking our turkey to the grill.  It was a huge hit and has since become a staple at our Thanksgiving table.  Cooking your turkey on the grill will also free up your oven, a huge bonus.  We hope you'll try it!


Roast turkey here...

Andy's Charcoal Roasted Turkey

Turkey
Salt
Pepper
Butter
3 carrots, rough chopped
4 celery stalks, rough chopped
1 large onion, rough chopped
Handful Italian parsley
Handful fresh sage
Handful fresh thyme
Wood chips (hickory preferred)

A full bag of charcoal
Large aluminum foil pan
Tin foil
Oven thermometer (optional)
Instant read thermometer


This is similar to roasting a turkey in your oven, but you are imparting smokey charcoal flavor. Pick a bird that fits on your grill with the lid on. Last thing you want is to go to put the lid on the grill and it doesn't close.

Prep the turkey by removing the neck and gizzard. Stuff the cavity with carrots, celery, onions and parsley, sage, and thyme. Generously, salt and pepper the bird all over and under the skin and in the cavities. Place the bird in the foil pan.

Prepare a charcoal grill for indirect grilling. Two piles of red hot brickets on either side of the grill (around 30 or so brickets per side). Situate the grate so the handles where there is a gap is above the coals. This will allow you to add charcoal easily. The foil pan should be able sit in the middle without getting direct heat from the charcoal. Soak a large bowl of hickory wood chips in water for at least 30 minutes.

Place the pan on the middle of the grill. Add several large handfuls of the moist wood chips to the charcoal. Place the lid on the grill with vents open on the lid and underneath the grill.

Every 20-30 minutes add a couple handfuls of charcoal and moist wood chips. Your goal is to maintain a temperature of about 350 degrees. Use an oven thermometer to check. The less you take the lid off the better.

After 1.5 - 2 hours stop adding wood chips when it has a nice golden smokey brown color and occasionally start adding a few pats of butter to the top of the bird. After a stick of butter, continue to baste the bird with the juices. Also lightly tent the breast with tin foil at this point.

Cook to an internal temperature of 165 degrees in the thickest part of the thigh and breast. Depending on the size of the bird this might be 3-4 hours total cooking time. Remove from heat and let stand for 30 minutes before carving. Make gravy with the drippings.

Link to Weber grill
http://www.target.com/webapp/wcs/stores/servlet/p/weber-one-touch-silver-kettle-grill-black-22-5/-/A-13034658


Friday, October 19, 2012

Pumpkin Chocolate Chip Cookies

My friend made these cookies for me on a chilly fall day years ago. I've made them every year since. Try them. They are a slice of heaven.


Pumpkin Chocolate Chip Cookies

1/2 cup butter
1 1/4 cup sugar
1 egg
1 cup pumpkin
1 teaspoon vanilla
2 1/2 cups flour
1 teaspoon baking powder
1 teaspoon baking soda
1 teaspoon nutmeg
1 teaspoon cinnamon
1/2 teaspoon salt
Chocolate semi sweet chips

Directions:

Cream butter, sugar and egg together. Add vanilla and pumpkin then mix. Put baking powder, baking soda, nutmeg, cinnamon and salt in another bowl and mix together. Add dry ingredients to pumpkin mixture. Add flour. Add half a bag of chocolate chips, or more if you like. Bake at 375 degrees for 10-13 minutes until no longer doughy inside. I have to say it, enjoy!

Saturday, February 11, 2012

Heart Shaped Chocolate Chip Muffins

Today all of my children decided to nap at the same time, sigh. While they were napping, I threw together the ingredients for these yummy chocolate chip muffins. They are super simple and surprisingly moist, probably because of the added yogurt. If your kids eat yogurt, the little 4oz vanilla YoBaby packs work great. The recipe makes a bunch, so you'll have plenty to share!


Yum, chocolate chip muffins ready to serve!


Chocolate Chip Muffins

1 egg
1 stick of butter, melted
1/2 cup milk
1/2 cup vanilla yogurt
2 cups flour
1 tablespoon baking powder
1 teaspoon salt
1/2 cup sugar
1/3 cup brown sugar
6 oz pkg chocolate chips


Beat together egg, butter, milk and vanilla yogurt.  Mix flour, baking powder, salt and sugars together in a separate bowl.  Add dry ingredients to wet ingredients.  Stir in chocolate chips.  Bake at 350 degrees in greased muffin cups or heart shaped baking pans for 15-20 minutes, depending on your oven.


Heart Shaped Baking Pans
by Chef Philippe


Monday, January 30, 2012

Valentine's Day Sweet and Salty Pretzels

These are the perfect treats to give your friends and family this Valentine's Day. They are salty, sweet and super easy. If you are short on time and energy, this is the recipe for you!

Ingredients
Packaging

Sweet and Salty Pretzels

Bag of small salted pretzels
Bag of vanilla wafers
Bag of Valentine m&m's

Preheat oven to 200 degrees. Arrange pretzels onto a nonstick metal pan. Place a vanilla wafer on each pretzel. Bake for 1 1/2 to 2 minutes depending on your oven. The wafers should soften but not completely melt or lose shape. When ready, remove from oven. Quickly place 2 m&m's on each pretzel/ wafer combo. Let cool on rack.

Place Sweet and Salty Pretzels in a clear cellophane bag and tie with ribbon. Give to friends and family as a special Valentine's Day treat!

Entertaining tip: Change the color of the m&m's and the ribbon to match your next themed party. They make the perfect favor!


You won't need Jedi mind tricks to enjoy these treats!


Saturday, January 28, 2012

Chicken and White Bean Chili

My husband and I used to hold an annual chili cook-off back in the day.  This Chicken and White Bean Chili was our "2006 Most Original Chili" winner.  It's the perfect meal for a casual winter get together.  The recipe makes a ton, so you can serve a large crowd or freeze the chili in mini portions for the nights you don't feel like cooking!

Chicken and White Bean Chili

3 cans great northern beans
1-2 cans green chilies
1/4 cup butter
2 lg onions, chopped
1/3 cup flour
4 cups chicken broth
3 cups half and half
4 cups shredded cooked chicken
1 Tbs chili powder
1 Tbs hot pepper sauce
1 Tbs ground cumin
2 tsp salt
1/2 tsp white pepper

1 1/2 cups grated Monterrey Jack cheese
1 cup sour creme
chopped fresh cilantro
green chili salsa


Melt butter in large pot over medium heat.  Add onions and saute until tender, about 10 minutes.  Add flour and stir 5 minutes.  (do not brown).  Gradually whisk in chicken broth and half and half.  Simmer gently until thickened, about 10 minutes.  Add white beans and green chilies, shredded chicken and next 5 ingredients.  Simmer gently to blend flavors, about 20 minutes.

Add grated cheese and sour creme to chili; stir just until chili is heated through and cheese melts (do not boil).  Ladle chili into bowls and garnish with cilantro and green salsa.  Serve over rice or with tostitos.   Enjoy!

Entertaining tip: For easy clean up and a casual vibe, pile soup bowls, spoons, napkins and toppings next to stove alongside chili.  I used these bowls from Anthropology...